Writing RMI Adapter AssemblyLines can be tricky at times, especially when it comes to the Search AL - the one used for Reconcile operations. This is because the Dispatcher calls the Search AL in Cycle mode, which causes it to work differently than you might expect.
The usual behavior of an AL is that an Iterator in the Feed section delivers data - one Entry at a time - into the Data Flow section where it is passed from component to component until the end of the AL is reached. At the end of each cycle, control returns to the Iterator which returns the next available Entry. If the iteration data set has been exhausted then the Iterator signals End-Of-Data and the AL terminates. When an Iterator-based AL is started then it normally runs until completion. If you launched it from another AssemblyLine then you can choose to either wait for completion, or allow it to run in the background while your calling AL continues its own processing. There is also a third option, which is to run the called AL in Cycle mode.
If the AssemblyLine is invoked in Cycle mode, then it only makes a single pass each time it is called and the calling process always waits for control to be returned. On the first call, the AL and its components are initialized and then the first processing cycle is performed, resulting in a Work Entry. Each subsequent call drives the AL for another cycle, returning either another Work Entry, or null once End-Of-Data is reached.
As long as the AL uses an Iterator in the Feed section then the built-in flow of the AssemblyLine will provide the caller - for example, the RMI Dispatcher - with a series of Entries as expected. However, the challenge arises when your AL must do more work to prepare each Entry. A common example is integration with a web service where a series of requests must be made to establish an authenticated session, followed by one or more requests to select relevant data - all before the first Entry can be returned.
One approach is to hide this complexity by scripting your own Iterator mode Connector. If you are comfortable using Javascript and have made friends with the AL Debugger, then rolling your own component could be your quickest option. Another route is to build an AL so that it will perform 'normal' iteration in Cycle mode, and here is an example of how to do this.
Create a new AL named 'CycleModeIteration' and then add the FormEntry Connector to the Feed section. This handy component supports only Iterator mode and works just like a FileConnector, except that instead of reading and parsing data from a file, it reads and parses the data entered in the Raw Data Text parameter of its Connection tab. We won't be using this functionality, instead substituting our own via Hook scripting.
Select the Hooks tab and then put this code into the Prolog - Before Init Hook to prepare for processing:
// Initialize two flags
eod = false;
initializing = true;
Then drop the following script into the Override GetNext Hook:
// If EOD flag set, end iteration
if (eod) {
result.setStatus(0); // EOD
return;
}
// Otherwise return dummy data to continue
// processing
result.setStatus(1); // More data available
work._dummyData = "* NOT DONE YET *";
The Override GetNext Hook code will replace both the read next functionality and the Input Map of the Iterator, so our logic here has to directly add attributes to the Work Entry.
Your AL should look like this.
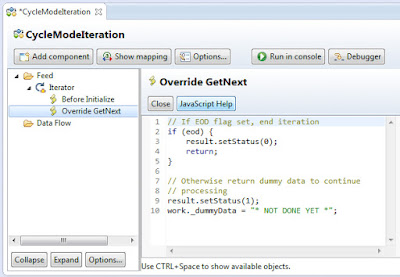
The Iterator now will continue to return a Work Entry with a single dummy attribute until the eod variable has been set to true, at which time it will stop cycling.
Next we set up the Feed section so that initialization and data selection is only performed on the first cycle. Do this by adding an IF-Branch and naming it 'Initializing'. Click on the Script button to add a scripted Condition and use this snippet so that it uses the initializing flag set in the Iterator's Hook:
return initializing;
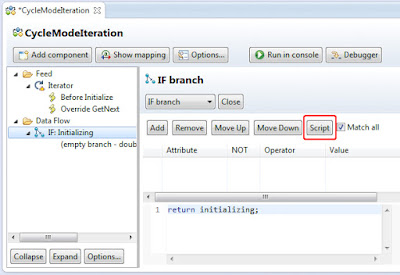
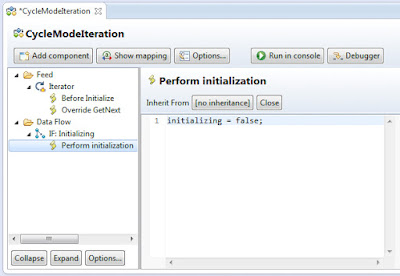
In an actual Search AL this Branch would contain the components required to establish a connection to the external service or system. For our example you right-click the IF-Branch and add an Empty Script component that you call 'Perform initialization'. It only needs a line of script that sets the initializing flag to false. Now the IF: Initializing Branch will only be active on the first cycle.
Following this Script component you add another one, this time named 'Prepare data set'. This mirrors the typical selection of entries performed by an Iterator. If a real-world Search AL is working with web service then it will request a data set and parse the return. Once again our example AL is extremely simple, using a hardcoded Array of data and an index variable initialized to 0.
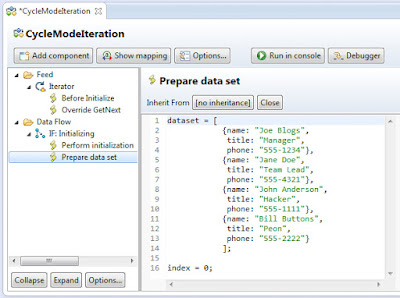
Here is the script shown in the screenshot above for easy cut-and-pasting:
dataset = [
{name: "Joe Blogs",
title: "Manager",
phone: "555-1234"},
{name: "Jane Doe",
title: "Team Lead",
phone: "555-4321"},
{name: "John Anderson",
title: "Hacker",
phone: "555-1111"},
{name: "Bill Buttons",
title: "Peon",
phone: "555-2222"}
];
index = 0;
Now comes the logic that delivers data as long as its available, at which time it then signals End-Of-Data and stops iteration. We implement this through two Branch components: First an IF-Branch labeled 'More data' followed by an ELSE-Branch called 'EOD reached'. For the IF-Branch, click on the Script button and add this scripted Condition:
return index < dataset.length;
These Branches will control how long iteration continues for our AssemblyLine.
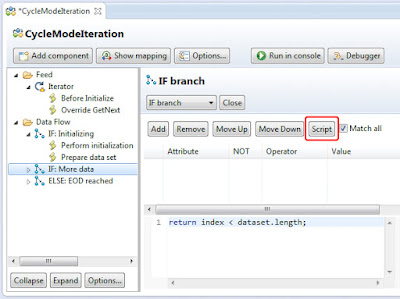
Components placed under the IF: More data Branch set up the Work Entry with attribute values coming from the next available item of data. For the example AL you create a Script named 'Get next entry' that contains the following code:
// get next entry and increment index
entry = dataset[index++];
// set up work entry
work.removeAllAttributes();
for (prop in entry) {
work[prop] = entry[prop];
}
The first line of script above retrieves the currently indexed Javascript object from the Array, incrementing the index variable immediately after. The next script line removes all attributes from the Work Entry, which at this point will only hold the dummy attribute set in the Override GetNext Hook of our Iterator. Finally a for-loop cycles through the names of all properties in the current object (i.e. 'name', 'title' and 'phone') and creates similarly named Attributes in the Work Entry with the value of each property. This Script component takes care of our Return Next Entry functionality. Now we need the logic to stop iteration after the last available data has been read.
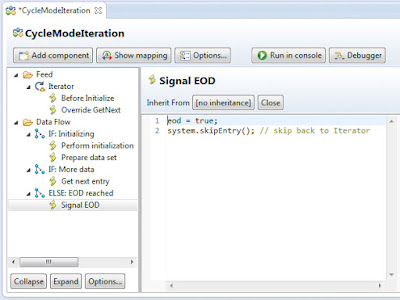
Under the ELSE-Branch you add a Script named 'Signal EOD' containing this script:
eod = true;
system.skipEntry(); // skip back to Iterator
At which point this example AL is complete.
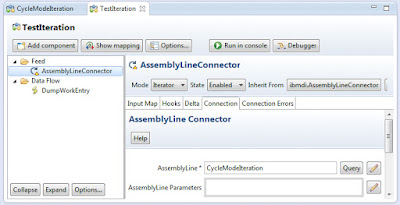
To test our new AssemblyLine we will create another AL, which we will call 'TestIteration'. Here you add an AssemblyLine Connector in Iterator mode to the Feed section. In the Connection tab of the Connector, enter the name of our example AL: 'CycleModeIteration'. The AssemblyLine Connector will run our example AL in Cycle mode, just like the RMI Dispatcher will. Also remember to add the wildcard (*) mapping rule to the Input Map so that all data is returned.
Finally, add the canned Script component named 'DumpWorkEntry' to the Data Flow section.
It is now time to run the test AssemblyLine and see our example CycleModeIteration AL works correctly. And if it does, then should see four (4) entries returned and displayed in the console output.
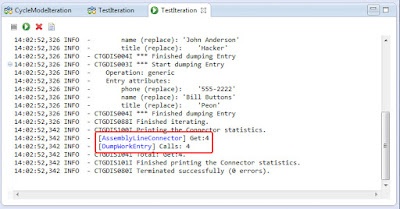
The component statistics displayed at the end of the AL run show us that everything worked as expected.
Note that if you don't get this result, then add the DumpWorkEntry directly under the IF: More data Branch (After 'Get next entry') and try running the example AL directly using the AssemblyLine Debugger. This will allow you to interactively walk component-by-component through its execution, including stepping through all script code. If you are not familiar with the AL Debugger, have a look at this video first.
Once the example AL is running correctly then you have a template from which to build your real-world Search/Reconcile AssemblyLine, simply substituting the hard-coded data set with actual information received from a connected service or system.


